DHTML widgets (as I like to refer to them) are DynLayer-based objects which generate all their own code - the CSS, Div's, and have all the code necessary for the "thing" to function. This is the ultimate progression of DHTML and JavaScript in Netscape 4.0 and IE 4.0. It is yet to be discovered if in the next versions of the browsers how useful these objects will be. There may be easier ways of accomplishing this type of coding, but for the existing browsers they work extremely well, and provide a basis for some very elegant JavaScript coding. IE 5.0 has a functionality called "Behaviours" that are something like this, although I have not investigated into coding to that model as pretty much anything I've seen can be duplicated with my DHTML widget model, and will be compatible with all DHTML browsers (NS4, NS5, IE4, IE5).
After reading this lesson take a look through the widgets that I've created to get some ideas of things to program and how to structure them. I'd be very willing to post widgets that other people have created, so I ask that if you do create something in this manner to share you results with the rest of the JavaScript community.
The way I've set up all my widgets are pretty much the same:
The constructor of the object should contain all the variables and information needed to make your widget. Usually they will have an x-y location, a width and height, among many other possible variables depending what your widget object will do.
function MyObject(name,x,y,width,height etc...) {
	this.name = name
	this.x = x
	this.y = y
	this.w = width
	this.h = height
	// etc...

	this.build = MyObjectBuild
	this.activate = MyObjectActivate
}
The name parameter is especially important. You need to have some common name for all the layers that are going to be written. You also need to know this name to set all the DynLayers. Now the easy way to do this is to pass a name parameter in the constructor:
myobj = new MyObject('myobj',50,50,100,100)
So in this case the name property will be used to write all the ID's with. In most cases there will be one master layer that contains a whole pile of nested layers. The names of these layers will be up to you to decide on, but they will/should all begin with whatever the name property is, ie. myobjLayer1, myobjLayer1 etc.
There is an optional way to handle the name property that I have conformed to in my widget objects. Simply keep a counter to automatically come up with a unique name for your objects.
function MyObject(x,y,width,height etc...) {
	this.name = "MyObject"+(MyObject.count++)
	this.x = x
	this.y = y
	this.w = width
	this.h = height
	// etc...

	this.build = MyObjectBuild
	this.activate = MyObjectActivate
}
MyObject.count = 0
This change will eliminate the need for a name parameter and let the object choose it's own name. Each time you create one of these objects the counter will go up, and you'll end up with "MyObject0", "MyObject1" etc. being the names for all your objects.
The build method simply assembles 2 strings which contain the CSS and the Div that will be written to the page to draw the layers.
function MyObjectBuild() {
	this.css = css(name+'MyObject',this.x,this.y,this.w,this.h...etc...)+
	css(name+'MyObjectLayer1',10,10)+
	css(name+'MyObjectLayer2',20,20)+
	css(name+'MyObjectLayer3',30,30)  // these other layers will be specific to your widget

	this.div = '<DIV ID="'+this.name+'MyObject"></DIV>'+
	'<DIV ID="'+this.name+'MyObjectLayer1"></DIV>'+
	'<DIV ID="'+this.name+'MyObjectLayer2"></DIV>'+
	'<DIV ID="'+this.name+'MyObjectLayer3"></DIV>'
}
That's all the build() method does, I used to have the build() object automatically write the CSS to the page but that causes some problems under early versions of Netscape, and makes putting many widgets on the same page a bit of a hassle. Instead I recommend manually writing both the css and div properties to the page.
The activate method is where all the action happens. This is where you'll initialize all your DynLayers, set all your events to them, and basically make the object come alive. There's an unlimited number of possibilites for things that can go on here. For some ideas take a close look at the activate methods within my objects like the Scroll Object, and List Object.
function MyObjectActivate() {
	this.lyr = new DynLayer(this.name+"MyObject")

	this.lyr1 = new DynLayer(this.name+"MyObjectLayer1")
	this.lyr2 = new DynLayer(this.name+"MyObjectLayer2")
	this.lyr3 = new DynLayer(this.name+"MyObjectLayer3")

	if (ns4) this.lyr1.event.captureEvents(Event.MOUSEDOWN)
	this.lyr1.event.mousedown = new Function("....")  // assign events to
}
Again, usually there will be one master layer that contains a bunch of other layers. This master layer should have DynLayer so that you have a way to control the entire object, hide, show, move etc. For lack of a better name I just assign this DynLayer to a property named lyr. All other layers can be whatever but myself I usually tack a 'lyr' on the end of the DynLayer property names just to be consistant.
Now that the object has all the information, we need to write the layers to the page. To do this simply document.write() the css and div properties:
<script language="JavaScript">

writeCSS(
myobj1.css
)

</script>
<body>

<script language="JavaScript">
document.write(myobj1.div)
</script>

</body>
The css can be written in the head or the body, just make sure it comes before any of the layers.
Now that the object has been created, and the css and div strings have been written to the page, the final step is to actually call the object's activate() method to set everything in motion.
function init() {
	myobj.activate()
}
And that's it, you have a widget object!
Okay, so now that we have standard structure for widget objects you have see how nicely this works when trying to do something useful. For this example I will create a simple widget that creates square box outlines that are draggable. Once we have an object that draws one of these boxes and makes everything work right, it'll be incredibly easy to create hundreds of them if needed.
I will be explaining this in the order that you would code this when you're building your own widgets, so please follow along.
To create such boxes we'll need 5 parameters: x, y, width, height, and color, so that's what the constructor will consist of:
function Box(x,y,width,height,color) {
	this.name = "Box"+(Box.count++)
	this.x = x
	this.y = y
	this.w = width
	this.h = height
	this.color = color
	// more methods to come
}
Box.count = 0
The build() method in this case is straight-forward, just uses the dimensions of the box to make on master layer named "Box" set the the full size of the box:
css(this.name+'Box',this.x,this.y,this.w,this.h)+
And then 4 nested layers each one pixel wide/tall for the four edges of the box:
css(this.name+'Top',0,0,this.w,1,this.color)+
css(this.name+'Bottom',0,this.h-1,this.w,1,this.color)+
css(this.name+'Left',0,0,1,this.h,this.color)+
css(this.name+'Right',this.w-1,0,1,this.h,this.color)
Each of the Div's are empty so those are easy. The full build() method is this:
function BoxBuild() {
	this.css = css(this.name+'Box',this.x,this.y,this.w,this.h)+
	css(this.name+'Top',0,0,this.w,1,this.color)+
	css(this.name+'Bottom',0,this.h-1,this.w,1,this.color)+
	css(this.name+'Left',0,0,1,this.h,this.color)+
	css(this.name+'Right',this.w-1,0,1,this.h,this.color)

	this.div = '<DIV ID="'+this.name+'Box">\n'+
	'<DIV ID="'+this.name+'Top"></DIV>\n'+
	'<DIV ID="'+this.name+'Bottom"></DIV>\n'+
	'<DIV ID="'+this.name+'Left"></DIV>\n'+
	'<DIV ID="'+this.name+'Right"></DIV>\n'+
	'</DIV>\n\n'
}
At this point we have already have enough information to create the boxes. So lets set up one box at location (50,50) with dimensions 100x100, and because I like red the color will be "#FF0000":
mybox1 = new Box(50,100,100,100,'#FF0000')
mybox1.build()
We gotta write the css string to the page so here's what that looks like:
writeCSS(
mybox1.css
)
And in the body of the document we must write the div string:
<SCRIPT LANGUAGE="JavaScript">
document.write(mybox1.div)
</SCRIPT>
It won't be draggable yet but you first have to have a widget drawn correctly before do anything else. So lets take a look at the widget so far.
Example: boxwidget1-build.html [source] - the beginnings of our box widget
Once we have a box that is being drawn correctly you can now make the activate method and set any DynLayers that you need to the layers. In my case, I need to have the main box layer to be a DynLayer, and add that layer to the Drag object. To accomplish the latter I made a separate method called makeDrag():
function BoxActivate() {
	this.lyr = new DynLayer(this.name+'Box')
	this.makeDrag()
}
function BoxMakeDrag() {
	drag.add(this.lyr)
}
Remember to add these methods to the constructor:
this.activate = BoxActivate
this.makeDrag = BoxMakeDrag
Of course to accompany this code we're going to need the assistance of the Drag Object source code, so be sure to add the Drag and MouseEvents libraries to the page:
<SCRIPT LANGUAGE="JavaScript" SRC="dynalyer.js"></SCRIPT>
<SCRIPT LANGUAGE="JavaScript" SRC="mouseevents.js"></SCRIPT>
<SCRIPT LANGUAGE="JavaScript" SRC="drag.js"></SCRIPT>
In order for the drag to work you must call initMouseEvents() in the init():
function init() {
	mybox1.activate()

	initMouseEvents()
}
Example: boxwidget2-activate.html [source] - a draggable box!
So now we are basically done, except for completedness lets throw in one more method to remove the layer from the drag object:
function BoxRemoveDrag() {
	drag.remove(this.lyr)
}
And while we're at it, lets test this object out by creating a few more boxes:
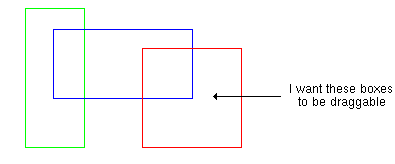
mybox1 = new Box(50,100,100,100,'#FF0000')
mybox1.build()

mybox2 = new Box(200,100,60,140,'#00FF00')
mybox2.build()

mybox3 = new Box(300,100,140,70,'#0000FF')
mybox3.build()

writeCSS(
mybox1.css+
mybox2.css+
mybox3.css
)
Remember to write all three of these boxes' div strings to the body:
<SCRIPT LANGUAGE="JavaScript">
document.write(mybox1.div)
document.write(mybox2.div)
document.write(mybox3.div)
</SCRIPT>
Example: boxwidget3-final.html [source] - final dragbox widget code
So that it's, the box widget is complete, and works great. But for some fun, lets just see how easy it is to create... oh... 50 draggable boxes!
Example: boxwidget4-50random.html [source] - 50 draggable boxes
| Home | Next Lesson: Scroll Object |